27 December 2011

Holiday Eats

There should have been a bread recipe last week; I was all ready to start another sourdough loaf when disaster struck. A wet bowl and some carelessness later, I had dropped my starter (in its Pyrex) to the floor, rending the bowl asunder. A new one has begun, but isn't quite ready. Much food was prepared, though almost all of it from a recipe. To wit:
  • Gougères. These were phenomenally easy, smelled like heaven when preparing, and impressed with flavor. I used a strong white cheddar with peppercorns in it and dropped the fennel; my beer was a low percentage (4.5 or so) stout with a strong flavor. Right after baking, they were crispy in all the right ways; the next day, after storage in an airtight container, they had softened.
  • Parsnip Latkes. I honestly didn't read the recipe besides ingredients and basic prep, so was surprised by the taste after making these. They are herby little punches in the mouth, especially with the sauce. We made them much larger than suggested (again, not reading very well) and got 4 latkes from a half recipe (should have been double that). Thinner would be crispier and recommended. Actually, just cook these regardless. Quite good.
  • Coq au Vin (Julia Child). So, that is how restaurants make those delicious glazes/sauces/etc for their meats. Render bacon fat into butter, cook meat in it; light it on fire with cognac, then add wine and stock. Reduce it an amazing amount, add in a bunch of soft things, and thicken with more butter and some flour. Honestly, it wasn't that much butter/bacon for the serving size (we cut down the butter to something like 4 tbsp total, plus 4 pieces of bacon, for ~4 large-ish meals worth of food). Not that unhealthy when viewed as such.
  • Cashew and raisin kale. E made this; it had those three ingredients plus some oil, lemon juice, and salt in a frying pan. It was quite good.
  • Oat-berry-rum rubbed apples. I mashed some raspberries with cinnamon and a splash of rum, plus a helping of rolled oats. Rubbed apple slices in it and baked for... 10 minutes? 20 minutes?... in a... somewhat hot oven? I honestly don't remember much; it was good.
  • Singed brussels. Blanched the brussels until soft to a fork, sliced in half, tossed with oil and salt, threw on a hot pan face-down until the ridges started to char. Turned down heat, tossed them around for a minute, ate. Good and simple.

E got me two cookbooks; Momofuku and The Cast Iron Skillet Cookbook. The latter is infinitely practical, intended for home cooking. The former is less so, though much more exciting; these are the actual restaurant recipes and prep steps, which means I can learn a hell of a lot about professional cooking vs. "home" cooking. All of the recipes, except the final "Ko" section, seem reasonable to me in terms of ingredients and time commitment. Hopefully I can try it out during New Years, given the free time I'll have.

14 December 2011

Sourdough: a Revival

I spent the past week with a cold, bookended with bouts of bread baking. Not much other cooking besides; a fair amount of canned soup, scottish oats, sandwiches, and eating out. I did make a comical observation - my weekend dinners consisted of three cultural takes on "round piece of dough as delivery method for meal"; namely Ethiopian, burrito, and gyro. I thought of pizza on Monday to round it out, but decided soup would be more fitting. But, yes, on to the bread. Last year, around this time, I started a sourdough experiment that ended when I got lazy and the sourdough got mold. Sad, really. A chance encounter with the Tartine Bread book in an art museum gift shop told me there was an easier way. Less baby sitting starter, less watching dough rise. Sign me up!
Armed with my partially-remembered sentences from a book and my newly-purchased cheesecloth, I began the starter. I did the following, and it seemed to work, though I'm not sure how proper it is: I put 1/4 cup whole wheat flour, 1/4 cup bread flour, and 1/4 cup + 2 tbsp warm water in a bowl (non-reactive, non-metal is a must - use Pyrex or equivalent) and stirred it. Cheesecloth on top, let it rest in my kitchen for 3 days. Made sure it smelled funny - cheesy, almost. Threw out half of it, added in enough flour/water to bring it back up to the same size; stirred. Let sat for 2 days. Made sure it rose a little. Also, smelled funny. Threw away half of it, refreshed back to size. Everytime it rose and then fell, I refreshed; the period is a feeding every 2-3 days right now and I've reduced the size a bit so it is perfectly sized for making a loaf of broad ~160 grams, of which 80 goes into a loaf. The refresh amount is about 2 tbsp of each whole-wheat and normal flour and 2.5 tbsp of water.
I've made two loaves with this; the first (pictured below) was a half-whole wheat bread with ~70% hydration. I skimped on salt accidentally, leaving it with that peculiar taste of bread that doesn't have any salt. The second loaf (both pictures above) was 100% white flour, not counting the starter, with ~80% hydration and black sesame seeds. The second loaf was infinitely better, so I've included the process below. And, for the person who doesn't have a few hours in the morning spare for bread, this recipe is fantastic - straight from the fridge to the oven, easy peasy. Delish.
_______________o_______________
Rustic Sesame, Naturally Leavened
Makes a single loaf
80g starter (recipe approximately above)
320g bread flour
256g cold water
10g black sesame seeds
5g salt

Take the starter right when it needs refreshing; that is, it has risen recently and begun to fall. Combine with flour, water, and sesame seeds and mix with a wooden spoon until it has come together, then stir for a minute longer. Cover; wait 30 minutes. After that first wait, add the salt to the bowl, lightly wet your hands, and stretch-and-fold the dough until you can no longer feel the grain of the salt. Cover, let rest for 3-4 hours. Stretch-and-fold it every 30 minutes or so, until it feels very difficult to do so or the bread has risen a bit (it will feel fluffier). Refrigerate the dough for a day and a night.

After giving it time in the fridge to complete the rising process, turn your oven up to 500 degrees and prepare, as I did, a bespoke dutch oven consisting of a cast-iron frying pan and a brownie pan, turned upside-down, for the lid. Have this in the oven to warm up. Remove the bread from the fridge, flour a work surface and your hands, and shape it into a round somewhat. After you think the cast iron is hot (30 minutes or so), place the dough on some parchment paper and put the parchment paper in the dutch oven, reducing the oven to 475. Cook for 20 minutes, remove the lid, and cook for 15-20 minutes longer (until the bread is ~200 degrees inside, looks golden brown, and sounds hollow).

Eat.

06 December 2011

"Country" Walnut Bread

A disclaimer: the recipe for this is in baker's percentage format. This means you need both a scale and, potentially, a calculator. On the plus side, you get a delicious bread with a bit of crunch, a lot of crumb, and a great crust. Until you stick it in your backpack not 10 minutes out of the oven and bike to work, that is. I don't recommend it with this loaf as the enclosed space and lack of cooling will soften the crust a ridiculous amount. This is one of the better loaves I have cooked, up there with the standard rustic mini baguettes (on which the dough is based), struan, and the previous walnut bread (which had mashed potatoes and potato water as the alternate flour). So, yes, do go out and make this bread. Wonderful, really.
_______________o_______________
"Country" Walnut Bread
Use 300g total flour for ~1 loaf

75% bread flour
20% whole wheat flour
5% coarse-ground cornmeal (polenta)
80% water (cold)
8% coarsely chopped walnuts
<1% yeast
2% salt

At least a night before you want to make the bread, combine some of the water and the cornmeal in a bowl and let soak for 30 minutes. Add the rest of the ingredients and stir with a wet wooden spoon for 2-3 minutes until the dough has come together plus a minute more. It should be sticky. Cover and let rest for 10 minutes. Then stretch and fold 4 times with a 10 minute rest between each; be careful, as the polenta and walnut will make bread likely to rip. Refrigerate over night.

Day-of baking, remove the dough from the fridge 2 hours before you plan to put it in the oven. Dust a work surface with flour, coat your hands with flour, and gently remove the dough from the bowl and shape into a loaf. Note that, due to the incredibly high liquid, if you shape this into anything other than baguettes you may want to coax it back into shape after an hour as it will have spread out; I assume a banneton would fix the issue, but I don't have one nor nor care to improvise one. For a boule, bake at 450 for 25 minutes, turning after 10-15 minutes. Once the time is up, shut off the oven but leave the bread in for an extra 5 minutes to crisp the crust further. Let cool for an hour if you want to preserve your beautiful crust.

02 December 2011

Something Like Bento

I've been trying to cook more, well, defined meals recently. The easiest way to do this is via a recipe, which usually don't make their way to this soapbox. The desire stems from my limited cooking vernacular; E ribs me about cooking "Mikey food" so often yet, without a recipe, that is the extent of my ability. Cook veggies so they are tasty? Sure, saute and season, maybe bake. Cook tofu? Sure, saute and season, maybe bake. So, to fix that. More recipes, more adventurous cooking. And, so, I bring you... Mikey food. Whoops.
While, yes, it is just cooked veggies, each bit was prepared individually, allowing me to play around with a whole four different preps in a single dish. The squash has rice vinegar and cayenne, the apple a mustard seed/sesame oil/rice vinegar dressing, the mushrooms soy sauce, and the rice furikake. I admit, none of that is very inventive, but it was a nice platform for experimenting.

The squash prep was probably the most involved; thinly sliced squash tossed in a bit of olive oil, cooked over medium without flipping or stirring until they became a little translucent. Sprinkle some cayenne over the pan, flip everything, add a dash of rice vinegar, and stir a bit. The mushrooms were equally simple - after the squash was out of the pan, the mushrooms went in until they started to sweat, at which point they were splashed with soy sauce, stirred a few times, and taken off heat.

The apple dressing is approximately 1 tsp coarse mustard, 1 tsp rice vinegar, and 1/2 tsp sesame oil. The proportions were easy but far from perfect; the main flavor was mustard seed. The egg was an attempt at soft boiling; the egg was too fresh, so I mostly destroyed it in removing the shell.

28 November 2011

Raspberry/Apple Tart

I have no Thanksgiving food to post; my only contribution was bread and non-adventurous versions at that. E provided green bean casserole with every ingredient from a can (the way it should be). There was a lot of other cooking this weekend, however. For starters, E proved she could cook things that don't come from cans and then some using my new tart pan with this:
A delicious raspberry/apple tart with a hint of cinnamon and a dash of sugar, but not much else. As much as I doubted her filling would work, I was much impressed by the final result. She added no liquid to the filling, simply cooking half the berries and the apple over medium until it transmogrified into a sauce. Magic, I know. It made a great dessert to the simple pasta I had prepared as well as breakfast and dessert over the next few days. I guess for revenge E didn't believe me that my pasta would work; fresh pappardelle noodles with heirloom beans, tomato, and kale. No sauce apart from what the beans cooked in, finished with some cheese. The cheese should probably have gone in the bean sauce, but otherwise wonderful
You'll also note another thing of note in the photo above - wine glasses. I caved and purchased some, which we promptly used with white wine despite the shape tending toward red (or so my casual wikipedia browsing has informed me, making me an expert in the subject of course).
____________o____________
Apple Raspberry Tarted
Makes a 6-inch tart with leftover crust for cookies

1 batch "pâte sucrée" pie crust (that is, one with an egg, no water,  and about half as much sugar as flour)
1 small carton raspberries
1 red apple
1 tbsp granulated sugar (+more to taste)
1 tsp corn starch
1 tsp cinnamon (+more to taste)

E decided to not pre-bake the curst; different recipes seemed to disagree on what one should do. Julia Child recommended we cook it all the way; the internet couldn't decided if we should not cook it, cook it half way, or cook it fully before adding the ingredients. Given that we were using apple (long cook time) and a sugar crust (prone to burning), I think the decision was a great one.

So, yes, prepare your pie crust as instructed by whatever recipe and put it in a 6-inch mold. Preheat oven to 350. Chop up about 1/2 the apple into berry-sized chunks and put in a sacuepan with half of the berries, sugar, cornstarch, and cinnamon. Stir over medium heat until it is a sauce. Taste and see if you want it sweeter or with more of a cinnamon kick; the provided amounts are a bare-minimum.

Fill the crust with the chunky sauce and place the remaining berries evenly on top of the tart. Cook for about 30 minutes, until the crust has browned, the berries on top have gotten juicy, and the apples have softened. Let cool for 15-20 minutes before slicing and eat the remainders cold for breakfast.

20 November 2011

Simple Stir-Fry, Simple Soup, Simple Quiche

For this somewhat rainy, mostly dreary weekend, E and I crossed something off our list - cooking from Julia Child (Mastering the Art of French Cooking in particular). We couldn't decide on a meat dish. Well, we could, but it was Coq au Vin and I didn't have a heavy dish too cook it in. We decided on quiche, which it also turns out I didn't have a dish for. With that purchased, we prepared our dairies. Cream, butter, Swiss cheese, don't go this was if you don't eat those things. A few things went wrong when making this- the tart pan I purchased had short sides; on top of that, the crust itself got too thick on the bottom. This meant bites were at least a quarter dough, and with a slightly undercooked dough (that is, not crispy), it was an issue. When fresh from the oven and piping hot, the dish was delicious. Cold the next day, it tasted like a chunk of dairy fat which, honestly, it was.
To accompany it, I took Child's Brussels sprouts cooking method but not the ingredients. Roughly what I have always done, with an extra oven step at the end, viz. put an x in the base, blanch or steam quickly, fry in pan until sizzling, and, with the extra step, cook in the oven for 20 minutes. I wouldn't recommend the oven step unless the Brussels are bathing in butter; only a small amount of each was crispy.

There was also a stir fry with miso; I measured everything, but the dish wasn't a standout. The ingredients were a nice mix, aptly labeled "Mikey Food" by the illustrious E. Tofu lightly fried then sauteed with broccolini and a miso-based sauce, with oven-roasted yams added at the end. Yams in stir fry are quite good, it turns out
The soup was another dish that, while pretty good, was nothing to write home about. Onion "stock", canned diced tomatoes, wild rice, a smattering of carrots and zucchini. Seasoned with Herbes de Provence, I burned my mouth on it too quickly to tell if it was delicious or merely good. It shouldn't be too hard to create a similar dish at home; ours was light on water and hence stew-like.

08 November 2011

Sweet Potato Bean Soup and a Cereal Update

With the changing of the clocks comes the changing of seasons in San Francisco - from just warm enough to warrant a short sleeve (on occasion, that is) to just cold enough to warrant a jacket (also, again, on occasion). For those not familiar, there are roughly two seasons in San Francisco, and those seasons come twice a year. Jacket, no jacket, jacket, no jacket (though the jacket season that the rest of the country calls Summer is a local effect and not, necessarily, felt in all parts of the city). But, yes, it is now the end/beginning of the year jacket season, and the necessitates some warm things. To start, Irish Coffee is now acceptable to order at bars where it is not their specialty. Also, you can make things like soup for dinner and not feel bad.

Which brings us to today's dish, of which I have no photos. It was an off brown color, under harsh indoor lighting, and the photographs were unappealing. The taste, though, was spot-on. While cooking it, I was worried it would be bland and flavorless; initial tastings supported this notion. It turns out that few things remain bland when a quarter pound of cheddar-like cheese is added, though. This was the dishes saving grace, without which it merely would have been bland mushrooms, zucchini, and kidney beans served in hot water. Before the recipe, a quick update on cereal experiments.
Bowl number two was much better; I did as I suggested I might last time and procured oat flour for the recipe and replaced molasses by honey. The results were superior, though slightly undercooked - 325 degrees for 35 minutes was not sufficient to turn the pieces crispy, though it also was not sufficient to burn them. Overall, a win in the taste category. A few pieces even had a proper air pocket in the middle! I think I know how to reproduce this effect, so I will try the next time. But, yes, the recipe I promised:
_______________o_______________
Creamy Sweet Potato and Bean Soup
Serves 2
1 yellow onion
2 zucchinis
1 large sweet potato
1 cup white mushrooms
1 cup stock (veggie or animal)
1 can (15 oz) kidney beans
1/4 lb white cheddar or other flavorful, melty cheese
1 tbsp butter
olive oil
herbs de provence
salt + pepper

Preheat oven to 375. Chop the onion into strands. In a cast-iron (or other oven safe) pan, melt the butter over medium then add the onion, stirring occasionally. While this cooks, dice the sweet potato. Once the onions are soft and have begun to sweeten, put half of them in a large pot with a dash of olive oil over low. Add the sweet potato into the cast-iron with the remaining half onion, add a dash of herbs de provence, and place in the oven.

Chop the zucchini and mushrooms into whatever shape you fancy for soup and add them to the pot. Increase heat to medium and add the stock and can of beans (with liquid). Add pepper, a dash of salt, and herbs de provence. Keep stirring and let simmer for 20 minutes, after which time the sweet potato and onion should be close to carmelized. Grate or dice the cheese and add it along with the carmelized veggies to the soup, stirring constantly until the cheese has melted and incorporated. Serve immediately, though it will be hot.

04 November 2011

Principia Cerealis

In my infinite wisdom, I decided it was time again to derive a recipe by first principles. This time: breakfast cereal. I thought this would be a non-trivial undertaking, and my first experiment has reinforced that notion. Though, the non-trivial bit is not what I expected. My first desire was to make, roughly, Captain Crunch (or one of its more natural cousins: Panda Puffs and Peanut Butter Puffins). That seemed difficult as I would be playing around not only with flour ratios, but also with peanut butter ratios. Better to stick to something even simpler - Barbara's Shredded Oats (Cinnamon). Here is what I ended up with; it looks atrocious and tastes edible.
My process was to start with the ingredients on the box - this reduced down to, roughly, five parts: flour, liquid sweetener, flavoring, leavening, and processed food stuff (preservatives, coloring, etc). I didn't need the last one, as I don't intend on putting this stuff in boxes and shipping it across the country. To begin with, I measured out 50g of flour and added what I thought were good amounts of the other dry ingredients, giving me the following base:

Flour: 50g whole wheat flour
Flavor: 2g salt, 2g cinnamon
Leavening: 2g baking soda

You'll note an immediate disparity here between my base recipe and that on the box - I am using whole wheat flour, not oat flour. This was a rash decision, prompted by the grocer being closed and my desire to start the process that very night, and one I hope to rectify with the next batch. Ignoring that and moving forward, I separated this into two piles - one of ~23g and one of ~33g. I added several ingredients to these:

23g batch33g batch
Liquid sweetner5g molasses3g molasses
Liquid15g water15g water
Extra flour5g whole wheat flour


Note the extra flour - I poured in too much molasses and tried to recover. The consistency of the 23g batch (which ended up at about 0.8 liquid) was sticky and hard to work with, while the 33g batch (about 0.6 liquid) only came together after hand-kneading with wet hands, which most likely bumped the liquid ratio to around 0.7.

I pressed the two batches into rectangles a cm or less thick, coated them in cinnamon, and cut them into cereal-sized pieces. These were placed in a 350 degree oven for, roughly 35 minutes. The next morning, there was no obvious difference between the two different batches other than the shape.

My tasting notes are rough, but go something like:
  • wow this is bitter but hey it is edible.
  • oh, it looks nothing like cereal and has the consistency of a dog biscuit." (don't ask how I know what a dog biscuit feels like when chewed)
  • salty salty salty aftertaste
  • no notable sweetness; hard to tell if the bitterness has erased it or it simply isn't present
Based on those, the plan for next time is a multi-pronged attack with a roughly 1 : 0.7 flour to liquid ratio. Firstly, no molasses. Honey instead. Whole wheat flour + molasses + cinnamon is far too much bitter. Secondly, the switch to oat flour which seems most prevalent in cereal brands. Thirdly, instead of pressing it flat and cutting it, I think I will press it flat, lightly bake it, then cut it in half and layer it, as cutting it into squares when double-layered should add a bit of air inside and hopefully get me closer to cereal (or far away from dog biscuit).

25 October 2011

Crackly Coffee Shortbread

My drip coffee ritual is now a common occurrence during the work week, thanks to a generous coworkers gifting of an electric burr grinder to the kitchen area. This also means that a dwindling bag of beans, not quite sufficient to brew a cup, has become something of an issue. I think I've got a solution to that, though. Adding to my long list of shortbread recipes is this one, a pleasantly crunchy, caffeine-spiked addition to any breakfast, snack, or tea time. The amount of beans I used was essentially a random guess that turned out to work quite well; the vanilla amount less so. The butter, sugar, vanilla, and coffee stage of the recipe smelled like heaven, but adding the flour muted the vanilla and baking it seems to have eradicated it completely. I'd recommend playing around with the vanilla amounts to try and preserve that flavor.
_______________o_______________
Crackly Coffee Shortbread
Makes ~12 cookies
1 cup flour
1 stick unsalted butter (1/2 cup)
1/4 cup powdered sugar
1 tbsp roasted whole coffee beans, plus extra for garnish
1/2 tsp vanilla

Cream the butter and sugar together in a mixing bowl. If you don't cream them and instead just mix them, you will get a denser cookie. With a mortar and pestle, grind down the coffee beans to a size bigger than granulated sugar (if you like crunch) or finer (if you don't). Incorporate the coffee and vanilla into the mixing bowl. Add flour and mix until the dough goes back to being a dough, not a bunch of clumps of butter and flour. You may need to "knead" the dough a little by hand if mixing via spoon.

Take a portion of dough about the size of my thumb, or about 1/12th of the dough, and roll into a ball. Flatten between palms of hands and place on a baking sheet. Garnish each cookie with a bean or two (optional) and maybe a fancy design (also optional). Turn oven to 350 and while that is heating, place the cookies in the fridge (not optional in the slightest). After no less than 10 minutes in the fridge, and if the oven is heated, bake for 22 minutes or until the edges have taken a very light browning.

21 October 2011

Cookin By The Book

Doing something new - following a recipe. To the letter. Well, minus E's dislike of spicy things. We cooked some Baingan Bharta last night. A dish we originally ordered because, honestly, we were too immature to not order a dish that sounded like an XXX version of a sitcom that doesn't exist. A dish we were surprised to find looked like cat vomit, but tasted nothing of the sort. Not that I would know, but if cat vomit tasted as good as the dish we had you can't really blame cats for eating it. The original plan was to make ratatouille, like in the movie of the same, but the grocer only supplied giant eggplant so it wouldn't be as pleasing to the eye. Hence, cat vomit. Obviously.
The recipe involved cooking with yogurt, something we swore would never be done again. There have been some spectacular fails of meals involving that ingredient. But it seemed to work out fine; I think because we used plain yogurt, not greek, and we cooked it at a high temperature for ten minutes. The only modification we made to the recipe was removal of the jalapeno and the addition of some cayenne pepper. We used two small heirlooms, one red and one green, for the tomato portion. They barely colored the dish. It still looks like vomit. But quite tasty.

18 October 2011

Brussels Burgers

This past weekend I went on a quick climbing trip to Bishop; the climbing, weather, scenery, and company were all grand. The food... well, I guess I am spoiled. Bishop has enough coffee shops that I have a favorite one but the other meal options were very much not the urban fare to which I have become accustomed. There were many sandwiches and heavier foods, the veggie options being somewhat sparse. Far too lazy to cook the night I got back (hello burrito), I rectified matters the next night with what might be considered a veggie slam dunk. I've made bean burgers in the past, though the emphasis has always been on the beans. Not this time, though that did lead to issues.
A mostly-bean patty is easy; mashed beans stick together rather well. A patty which is half shredded veggies needs a little more coaxing. Even more so, in fact, than I could provide. I ended up with a few chicken nugget-sized patties but mostly got a hash of sorts. I would recommend either caving and using an egg for binding, upping the flax seed and water content, or trying something with more cornmeal and water. Possibly even using the liquid from the canned beans.
_______________o_______________
Brussels Burgers on Sweet Potato "Buns"
Makes maybe 10 patties (serves 3ish)
1 sweet potato
1 can garbonzo beans (15 oz, I think ~2 cups?)
~8 brussels sprouts (an equal volume to the beans)
2 shallots
4-6 button mushrooms
2 tbsp cornmeal + extra
2 tbsp water
1 tbsp flax seed
1 tbsp soy sauce
1 tbsp sesame oil
1 tsp cayenne pepper
1 tsp cumin
salt
olive oil

Preheat oven to 350. Slice the sweet potato into thin, circular pieces. Toss them in a small amount of olive oil and salt. Put the slices on a baking sheet and place in the oven. Coarsely chop the shallots and put them in a large frying pan over medium with a dash of oil. Shred/dice the brussels and add them to the pan after the shallot has softened with a splash of oil. Stir every minute or so, and dice the mushrooms. After the brussels have softened, add the diced mushrooms and sesame oil to the pan and cook for another 5 minutes.

This should take under 20 minutes; at the 20 minute mark, flip all the sweet potato slices over and put them back in the oven. Empty the beans into a bowl and mash them into a paste; add enough of the pan contents so that it is 50/50 beans/not beans. Add in the cornmeal, water, flax seed, soy sauce, pepper, and cumin; stir to evenly distribute everything.

You'll want to take out the sweet potatoes 10-15 minutes after you flip them (depending on thickness), so that might be during the next stage. Just shut off the oven and leave them in if it is.

Heat the large pan from before with a nice amount of oil over medium high. Put a layer of cornmeal on a plate and take slightly-larger-than-golfball bits out of the mixture, shape into patties, and coat with cornmeal. Cook them for about 5 minutes, flip them, and cook them for a few minutes longer (enough to make both sides brown and somewhat crispy).

Serve on potato buns with any extra brussels mixture as a side. It shouldn't need ketchup, but some people are weird.

29 September 2011

Sesame Spelt Bread

Back to non-failing bread, and it feels pretty good. This is after my no-rise bagels (dead yeast) and my no-rise mini baguettes (too much salt). Now, there is definitely one are where this recipe could be improved and a large avenue for experimentation. But - still good, still workable. Not a complete failure. The recipe is based off of the 50% whole wheat rustic from Artisan Breads Everyday, but contains a few tweaks. The goal was to create something like a pain au levain, without all that starter business. (Not that I'm against starters; one should be starting up this weekend).
It wasn't perfect, but it was close. The bread was a bit too much like a honey whole-wheat sandwich loaf than I would have liked. That is, it was soft but not airy, and excelled at soaking up honey (and, presumably, pbj if I had it handy). The spelt gave it a nice nutty flavor; I don't think the sesame seeds did anything besides poke out of the crust like sailors bobbing in the waters near a shipwreck. The biggest issue was definitely the texture, which was caused by my inclusion of olive oil in the recipe. I would cut it in half as an experiment; removing it entirely would likely prove drastically dry. Walnuts would also have been a great addition to this loaf, though I did not have them handy.
 _______________o _______________
Sesame Spelt Loaf
Makes 1 loaf
225g water
130g bread flour
130g whole wheat flour
20g spelt flour
20g sesame seeds
12g olive oil (halve this for a airier, less moist loaf)
5g salt
3g instant yeast

At least a night before you want to bake the bread, combine the dry ingredients in a bowl and mix. Add in the water and olive oil, and stir with a wooden spoon for 5 minutes. Let rest for 5 minutes to hydrate things, then stretch and fold 4 times with a 10 minute break between each. Place in a clean bowl, cover tightly, and place it in the fridge.
The day of baking remove the dough from the fridge 1.5 hours before you wish to put it in the oven and shape it however you like (it might actually make great rolls as-is, without cutting down the olive oil). Place it on a parchment-lined pan, cover it, and let it sit until baking time. Preheat oven to 500, put the bread in, lower to 450, and cook for ~35 minutes. Check and rotate the loaf at the 15 minute mark. It is done when it sounds hollow and the top is very hard.

25 September 2011

Tomato-Radish Lentil 'lenta

In a shocking turn of events, the weather turned cold for the weekend. The (relative) heat of last week made cooking difficult, as did a rather packed schedule. I managed a round of bagels, on which the yeast did not activate. To follow that up, I cooked a dinner of which none of my photographs turned out. Cell phone camera, combined with low light, strikes again. But, I'll still provide the recipe because it was highly edible and a great foil for the cold weather. The dish was partially influenced by a brunch item at Gather - the lentil and polenta. It was a great breakfast food that I wanted to fashion as a dinner. I mostly failed, because I don't season things enough. More following of recipes may be in my future. So, yes, the flavor could stand to be improved but everything else about the dish was good. Have at it (or don't).
_______________o_______________
Lentil 'lenta
Serves 2
1 standard size can of lentils or lentil soup
2/3 cup dry polenta
2 cups water
bunch of radishes (15 or so)
2 flavorful tomatoes
1 shallot
1 tbsp olive oil
spices other than what I used (cumin, dill, and cayenne) or in larger quantities
salt
(optionally) butter or cheese

So, lots of things going on at once with this recipe. Take 5 radishes and dice them, reserve a single radish, then slice the rest in half. Toss the halved radishes in the olive oil and salt, then place in a 350 degree oven for 20 minutes. Once they are in the oven, dice the shallot and sautee it over medium until it has yellowed and lost some flavor. Cut the tomatoes into 6-8 slices each. Put one of them, as well as the diced radish, in with the shallot. Place the other tomato in a pot with the water and bring to boil while making sure the pan doesn't burn. You can, if you want, add some butter or cheese to the pot of water.

Once the water is boiling, add the polenta, reduce heat, and stir. Add the can of lentils to the frying pan, season it, then alternate between stirring the polenta and lentil mixture. You are aiming for a runny polenta mixture, which takes 5-10 minutes of cooking. This should be timed for the radishes coming out of the oven. Serve in a bowl with polenta put in first, the lentil mixture spooned into the center, and top with the baked radish. Slice the single, reserved radish for garnish.

22 September 2011

First Attempts at Pizza

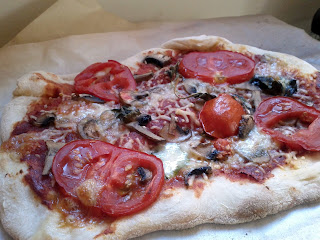
It was finally decided that pizza would be cooked for dinner. Discussed many a times, even enacted once at a cooking class for E's birthday last year, but not for friends. My local expensive yuppie grocery store recently began stocking tipo 00 flour, the kind (hypothetically) used by chefs in Neapolitan cooking for their famous pizzas. That is, assuming you buy tipo 00 bread flour and not pastry flour. My packaged contained, as you can see, many photos of bread. The protein content was listed as 3g for 30g of flour (10%+ protein is a good indicator) and listed its humidity as 15,50% (another good indicator that it is meant for bread).
So, we set to work preparing procuring ingredients and prepping dough. The Saturday farmers market seems to be lacking in Mozzarella; though it appears Californian producers exist, none was found for sale. We did manage the large, juicy heirloom tomatoes and some smaller green zebra ones, as well as fresh basil. Generally, a pretty poor haul but we also wanted simple pizzas. We also snagged dates, as all the delicious ones are finally back in season. Notably Barhi dates, both unripened and ripe. Do try the unripened if you can, for an interesting experience, but note it was something like eating waxy paper or really bad jicama. It is amazing they turn into the ripe version; if you let them get warm in the sun they explode in your mouth. Soft, sweet, utterly delicious. But not a pizza topping.
For the dough, we used a modified Reinhart recipe, leaving out the oil and honey, and substituting 100% tipo 00 flour. The recipe warned us that less water would be needed; I didn't really listen. The initial dough was almost a batter, like the mini baguettes I make so frequently. Good for those, not so great for a pizza crust (unless you want it misshapen and thick). Just for the hell of it, I took about 1/4 of the dough aside to see what it would be like as crust, then poured flour into the dough and mixed until it felt right. I ended up using ~20% more flour than the recipe called for. So, yes, tipo 00 needs much less water than you would expect. And it still wasn't really glutenizing all that well, likely due to a combination of being worked for too long a period and being mixed in stages.
The resulting pizzas were quite good, though I'm not sure the crust had anything to do with it. The first pizza (the last photo here) was under-cooked. Given that the oven seemed to top out at 500 degrees, the cooking time was extended from the recommended 5 minutes in to the 10-15 minute range. The best pizzas were ones with a crust that had just started to blister and brown, however long that may take in your oven.


15 September 2011

Commissioning a Supper in C

I got a cold, which sucks. Though, in my search for non-orange sources of vitamin C, interesting facts were learned. Such as: a single red bell pepper has 2-3 times as much vitamin C as a single orange. A good fact to know; bell peppers can have hummus on them, oranges not so much. Bell peppers easily go in most cooked dinners, oranges not so much. Bell peppers taste good, oranges not so much. So; a dinner. It should contain red bell peppers and be warm, those being my only constraints. I went with a slightly-modified standard of my college days - Spanish rice. It defied all earthly descriptions.
Too many times I've burned my Spanish rice due to poor pots and improper heat; I finally found a way around that. I cooked everything in a pan, stirring constantly, instead of in a pot with the lid in. I used arborio rice, which you can probably find at your local upscale grocery store or any place with a wide grain selection. It's the rice you would use for risotto. You can also substitute other beans in this recipe for garbanzo, or leave them out entirely - if so, use some vegetable or chicken broth in place of the bean liquid. A perfect dish for a cold, much better than the canned soup I had for lunch; warm and golden, like an oven that's wide open.
_______________o_______________
Spanish Rice and Beans
Serves 1
1/3 cup arborio rice
1 small (8 oz) can garbanzo beans
1 cup liquid consisting of all the bean juice + water to top it off
1 red pepper, diced
1 flavorful and soft (heirloom) tomato, chopped into 8+ pieces
dash cinnamon
dash cumin
dash ground ginger
rosemary for garnish

In a pan, heat a bit of olive oil over medium-low. Add in the diced bell pepper and cook for 5 minutes. While that is cooking, separate out the bean liquid from the beans themselves and add enough water to get a cup of liquid. Add rice to the pan and sautee for a minute before adding 1/4 or 1/3 of the liquid, the tomato, and all the seasoning but the rosemary. Stir constantly; don't let it boil, though it should be hot enough that if you were to stop stirring it would boil. Once all the liquid is absorbed, pour in half the remaining liquid. Continue stirring; once all of that liquid has been absorbed, add in the beans and the rest of the liquid, cooking until all is absorbed. Top with rosemary and serve; to your nephew you can give it as a present.

You may need to (or choose to) add more liquid; this will make it more of a risotto. If you go this route, you will want to add more flavor; either in the form of butter, more tomato, or stock of some sort.

08 September 2011

Further Research into Popped Loaves of Bread, and Others

It has been a while since my last post. Shortly after coming back from vacation-vacation, I went on a week-long work-vacation to attend PAX, visit my family, attend a wedding, and work out of every coffee shop I could think of drinking in in the neighborhoods of Seattle that I know. To name drop: Victrola, Vivace, Verite, Fiore, Trabant, Solstice, Ladro. I did a tiny smidge of cooking by introducing my grandparents to the wonder that is dinosaur kale and by making them a loaf of bread. I did a rather lot of eating out, some of it even at new places. And now that I'm back, I've done a bit more cooking. All of these things in due time.
First, the bread. It looks like some other popped loaves I have prepared. This had a few things in common with the first loaf - that it used normal flour and it was cooked in an oven that was not my own. The oven is most likely older than I am, and probably approaching as old as my mother. It doesn't like being told what temperature to cook out; I set it to 425 and it gladly sat at 450 for long enough to call it stable; yet, when I checked ten minutes later it was sitting at 475. This gave the bread a somewhat scorched flavor, but it still had an odd taste which I will attribute to the use of normal flour. My grandparents found it delicious but I found it simply average. Lesson learned, don't use normal flour for bread. Moving on from this bread, I cooked dinner with E last night and made, roughly, this
It was pretty good, though we did make a few substitutions. Noticeably, we have figs where the recipe called for dates (we both read figs, and local figs where available). Less noticeably, although very apparent when tasted, we left out the serrano pepper and put in chili powder in its stead. Not enough, though. E commented that the sauce tasted like herbed cream cheese and that it belonged on crackers or bagels; I would recommend making sure it has a kick, and, if you are using a mortar and pestle in place of a food processor, cutting the amount of oil in half initially and building from there. Still, a delicious meal that was, roughly, one pan. Especially so if you leave out the mint sauce.
And, lastly, the notable places I went to in Seattle much in the style of my fellow food friend

  • ThaiTom because that was a large part of my college cuisine. Cheap Thai food ready in 5 minutes, seating right next to the woks where the magic happens? Sign me up!
  • Solstice because ditto, although the coffee-and-bagel portion.
  • Paseo. Yes, I was just in the Caribbean. No, they did not have sandwiches anywhere near this level of goodness.
  • Palace Kitchen, which was an excellent meal for a good price (as always). We had an appetizer and split the burger; I would recommend the same.
  • Tilth; I felt like spending a chunk of change on a good meal. This was definitely a good place to do it. We went with the smaller tasting menu and enjoyed every dish.
  • Facing East (on the Eastside, but not too far out of the way). Something about this place was delicious; I don't know if the food was truly good or if it was simply the sauces.

23 August 2011

Puff Pastries (Wasabi Chevre + Crystallized Ginger)

Yes, you read that correctly. Yes, they were delicious. The ball of wasabi chevre I mentioned last post has gradually been getting smaller. It goes well on my (current) cracker of choice, ak-mak, so that made a dent. E and I put it to good use on sandwiches - toasted hippie bread, tomato, avocado, frisee, pear, wasabi chevre - that were delicious in every way. But, still, it hasn't been quick enough. I run away to Seattle shortly and my fridge has a few too many perishables. Coworkers give me a great outlet for eating my food, but I wasn't going to show up in the morning with a block of cheese and crackers and beg them to eat it. So, pastries seemed the obvious choice.
These are moderately recognizable - I've made something similar before, though with jam. I had learned some lessons last time; 1) they needed to be stuffed with filling rather than merely spread and 2) powdered sugar gives a flavor, but not quite what one expects on these. I solved (1) in the obvious way, and (2) was done in by muscovado sugar. I also knew the chevre, by itself, would be good but not quite enough. Sushi tells me that ginger and soy sauce go well with wasabi. One of those is an obvious choice; I toyed with the idea of topping them with fresh ground black pepper instead of muscovado but quickly abandoned it when I tested a bite containing all three of those powerful flavors (wasabi, ginger, pepper). I made the dough at night, rolled it out and cut it, then in the morning filled, folded, and baked them. Fresh from the oven was the best; the chevre loses a lot as it cools. If you are going to make these, consider it as an appetizer to be served immediately.
_______________o_______________
Puff Pastries (Wasabi Chevre + Crystallized Ginger)
1 stick of butter worth of rough puff pastry
~3 oz wasabi chevre
~10 pieces crystallized ginger, chopped finely
muscovado sugar (for garnish)
ground ginger (for garnish)

The directions for construction are fairly obvious - make squares a few inches on each side. I think I put, roughly, 1/2 tbsp chevre and 1/2 tsp ginger in each pocket. Enough so that, when sealed, they were mostly full. Using a spoon, I put a little muscovado on each and spread it in with a finger tip, then sprinkled powdered ginger over the whole thing.

Bake for ~18 minutes at 400 degrees on a parchment-lined sheet; I might suggest 425 degrees for less time, to get a bit more browning, but I didn't try this.

19 August 2011

Raw "Pasta", Al Dente

I finally got around to cooking a meal now that I'm back; there was a bit of eating out and lazy nights to get the beans and rice diet out of my system. But now I'm back in the kitchen and my non-existent slave-driving domestic partner couldn't be happier. And, actually, my coworkers are happy too - bread has resumed. The bread won't get much space; it was roughly this recipe without the potato or walnuts, and 10% of the flour weight replaced with polenta. Very chewy, very runny dough, with a bit of a crunch and sweetness from the polenta.
For my first cooked dinner, I wanted to take advantage of the bounty of fresh, delicious vegetables one gets in the Bay Area. I also didn't want to cook. So I compromised - I would prep something, but it would be raw. I've had (and made) raw "pasta" consisting of shredded carrots and zucchini a few times. The prep time is minimal, unless you are an idiot like me and decided to slice the veggies with a knife instead of using a cheese grater. Don't do that, unless you have a lot of patience, a very sharp knife, and like things crunchy. Just, you know, use a cheese greater. Hell of a lot easier to eat, as well. You also want to make sure you use a very flavorful tomato - something big and heirloomy; the tomato is a lot of the flavor in this dish and a weak-ass roma really won't cut it. I also want to draw special attention to the cheese I used - wasabi chevre. With real wasabi, not a horse radish base. This stuff is divine and you should go buy some and put it on everything you could imagine putting chevre on.
_______________o_______________
Raw "Pasta" Al Dente
Serves 1 (not all by itself, mind you)

1 good sized carrot, grated or sliced very thinly
1 good sized zucchini, grated or sliced very thinly
1 giant (or 2 normal) heirloom tomatoes, the more flavor the better
wasabi chevre (or really any very soft cheese)
grated parmesan
~1 tbsp olive oil
~2 tsp rice vinegar
freshly ground salt and pepper

In a bowl, combine the carrot and zucchini. Slice the tomato into wedges and squeeze them very lightly over the bowl, then throw them in as well. Add the olive oil, vinegar, salt, and pepper and toss to coat everything evenly. Add more of ingredients if needed for taste. Serve on plate, sprinkled with parmesan and topped with a dollop of chevre.

14 August 2011

Posts to resume soon

And here is a quick computer drawing of a notebook sketch I did about why I haven't been posting.
Some things about Belizean food: unless you go to the South (we didn't), you should really like rice and beans with stewed meat. Potentially also beans and rice (which, it turns out, we enjoyed more than rice and beans). You won't be getting much else. Even though it is the only cheap beer, Belikin isn't half bad. Go for the stout, and don't be surprised when you find your beer empty way earlier than expected. The bottles are very heavy and not very large. Drink lots of Panty Rippers just to see if they live up to their name; if you want something manlier just go for some One Barrel with lime. If you find yourself on Caye Caulker you should try eating at Fran's - more for the atmosphere (picnic tables force conversations with strangers) than for the food (standard-fare barbecued things). Eat some Johnny Cakes for breakfast - we didn't until the last day and Great Scott were we ever missing out. And, as always, be wary of cheap sea food specials so you don't end up sick like me.

01 August 2011

Shortbread + Irish Cream

It has been quite some time since the last round of shortbread, but they are not forgotten. To the contrary, I made biscotti regina a bit ago from this recipe, but didn't honor it with a post. I would recommend adding some anise (or anise-like flavor, like absinthe) to that recipe and otherwise no changes. But! Shortbread! With Irish Cream! The goal of this experiment was to make the shortbread still look like shortbread, but have a creamy boozy flavor to them. It almost worked; the final texture is very nice and they taste good, but the cream doesn't really come through. More booze, maybe? I used 2 tbsp Irish Cream and 1 tbsp olive oil; I've changed that (without trying it) to 3tbsp Irish Cream and no olive oil in the recipe below. Otherwise: A++ would bake again.
_______________o_______________
Irish Cream Shortbread
Makes 1 dozen cookies
1/2 cup pastry flour
1/2 cup all-purpose flour
1 stick unsalted butter (1/2 cup)
1/4 cup powdered sugar
3 tbsp Irish Cream
large crystal sugar for garnish

Cream the butter; if using a blender this is easy. If using your muscles, I like chopping it finely and then stirring with a fork. It may not cream; no worries, the Irish Cream will save you. Once the butter is creamed, add in the sugar and cream again. Add in the flour and mix until it begins clumping; it may not form a ball; that is fine Irish Cream will save this as well. Add in the Irish Cream 1 tbsp at a time; the dough should now definitely form a ball. Using your hands, divide the dough into about 12 pieces and shape each like your thumb (by rolling it into a ball, then rolling the ball between your hands to elongate it). Put the shaped cookies on a baking sheet, sprinkle the sugar over the tops and lightly press it in, then refrigerate for 30 minutes. Preheat oven to 350 and cook for 25-30 minutes, until they have browned slightly around the bottom. Rotate the pan at some point if you want to be anal about these things or your oven has a vendetta against even baking.

You must must must let them cool; unlike cookies, shortbread fresh from the oven is not good as it will still be soft.

Buckwheat Scallion Pancake and Miso Stir Fry

I've, roughly, made this exact meal before, but that won't stop me from making it again. I changed up some ratios a bit, and swapped out many of the ingredients in the stir fry. Still, a quick meal with a sauce that doesn't quite come together, ever. One of these days I may need to make a sauce all proper-like, with a boil and reduce with cornstarch by itself before tossing it onto the stir fry proper. However, due to the liquid nature of the sauce I made I did get a very nice texture to my tofu. I used high-protein firm tofu, browned on all sides in oil. It then sat it liquid and, roughly, steamed. The outside was very firm and tough, but the inside was almost spongy; I think there is promise in the fry-->steam/boil method.
_______________o_______________
Miso Tofu Stir Fry
Serves 2
12 oz high-protein firm tofu, cubed
enough bok choi for two
1 large heirloom tomato
1 red pepper, diced
1 tbsp soy sauce
2 tbsp red miso paste
1 tsp oil
6 tbsp hot water
1 sprig green onion, chopped
spicy seasoning of your choice

In a large frying pan over medium high, heat some oil. Toss in the cubed tofu and brown it on all sides. While browning, combine the oil, soy sauce, miso paste, hot water, green onion, and spicy thing in a bowl and mix until the miso has dissolved. Once the tofu has browned on all sides, add the pepper and bok choi to the pan, reduce heat to medium low, and cook for a minute or two before adding the sauce and the tomato, chopped into a few pieces. Cook for ten more minutes, stirring intermittently. The tomato should disintegrate somewhat in the sauce; you can try adding flour or corn starch to thicken it up.
_______________o_______________
Buckwheat Scallion Cakes
Serves 2
2 tbsp buckwheat flour
6 tbsp all-purpose flour
1/4 cup hot water (boiling if you want)
2 tsp ground ginger
3 springs green onion, diced

Combine all the ingredients in a bowl and mix with a spoon for a few minutes. Knead gently a few times, then let rest, covered, for thirty minutes. After letting it rest, form into 2-3 cakes and cook each in a bit of oil over medium-high.

25 July 2011

Roasted Summer Squash and Cherry Tomatoes

On my way back from buying random bottles of beer with interesting labels, I stumbled upon a produce store I didn't know existed. Everything looked delicious, it wasn't too expensive, and their plums where ready to eat. I picked up some cherry tomatoes, avocado, and summer squash with the intention of making a sandwich out of it for dinner. Then I lost track of time playing Dungeons of Dredmor and just ended up eating a sausage. No loss, but it did mean I had more time to contemplate what I would do with the veggies for lunch the next day. Polenta seemed like a good call - roast the roastables, eat it with polenta and beans.
Turns out, it was a pretty good meal. I used paprika and cumin, with a hint of cinnamon, on the squash and just salt and dash of cheese on the tomatoes. The polenta really needed some more flavor - more cheese, onion, garlic, something. I used 2 cups of water, 1/2 cup of dry polenta, and maybe 1/8 a cup of cheese. Double that amount of cheese, at least. I would also recommend slicing the tomatoes in half before baking, as 425 degrees for 15 minutes was not enough to char them. Maybe I was just impatient and hungry, but recipes I looked up said it would only take 10 minutes at that heat. Also be very careful biting into them; the embarrassing outcome of squirting tomato juice? Much more painful when they are fresh from the oven. Seriously, it hurt.
_______________o_______________
Roasted Squash and Cherry Tomatoes
Summer squash for N people
Cherry tomatoes for N people
Olive oil
Sea salt
Cumin
Paprika
Cinnamon

Preheat oven to 350 and prepare a baking sheet lined with foil. Slice the squash into circles. In a small bowl, combine olive oil and sea salt. Put in a slice of squash, rub both sides, then rub it against a fresh piece of squash to evenly distribute the oil and cut down on how thickly coated the squash will be. Place on foil; repeat for all slices (rubbing half in the oil and rubbing the other half against an oiled slice). Afterwards, put an equal amount cumin and paprika in a bowl and sprinkle it (or rub it) over the tops of the slices.

Put in the oven for 15 minutes, then remove it, flip over the slices, and season the other side. Add a little cinnamon if you wish, then put it back in the oven. While the squash is baking, in the olive oil and salt bowl, toss the tomatoes. After the squash has been in the oven for 25 minutes, up the temperature to 425 and put the tomatoes in the oven. Cook for at least 10 minutes longer; the squash should brown and hopefully the tomatoes will as well. Sprinkle some grated cheese (like Parmigiano-Reggiano) over the tomatoes and it will melt in.

21 July 2011

Dirtbag's Delight (First Pass, IPA Edition)

First off: long span without a post. It's not that I haven't been cooking or that I don't like my readers. I've just been very lazy the past few weeks. I've cooked a few meals - the most recent of which didn't even have kale in it (though I did cheat and use broccolini, but it was stir fry and not cooked in the oven). I've failed miserably - if cooking teriyaki sauce from scratch follow the directions. Yes, you do need that much sugar and soy sauce. It is disgusting and you are probably better off not knowing. I've partaken in some delicious cookies, though I didn't cook them. You should, though. Quite good. I even made some bread and didn't show you any of it. But I do return, triumphantly, with a delicious loaf.
I wanted to create some bread for climbers, hence the name and ingredients. "Dirtbag" isn't the best of words, but for climbers it means someone who may live out of their van and spend their days climbing and being cheap on food. A standard meal might be a can of beans, or a loaf of bread and a block of cheese. So - a loaf inspired by this life style. It has everything you'd need during/after some hard work: bread, cheese, beer, and nuts. You could even put peanut butter on it, if you dared. For an experiment, it was quite good. I did have some spillage, as you can see. I even poked holes in the bread to let it air some, but this was not very effective. Instead of going for a spiral, kneading in the cheese would probably be a better option, though you will be left with a much softer crust.
I used a standard bread base (Lean Bread from Artisan Breads Everyday) and built on that. I wanted to be a bit conservative, so only half the water in the recipe was replaced with beer. Taking it higher could work, but I would worry about the crumb keeping and about the yeast/salt/flour ratios being off. I added a small amount of walnuts; not because I didn't think more would work, but rather that it was all I had left. It was so small a percent, in weight, that I didn't think I needed to counteract it with wheat bran (maybe put some in if you go over 25% flour weight in nuts/seeds/non-wheat flour). The amount of cheese was a guess, just putting on enough to cover the surface area I had available before rolling up the log. As mentioned above, consider not doing a spiral or finding some other way of keeping the cheese in.
_______________o_______________
Dirtbag's Delight (IPA Edition)
Makes 1 standard loaf (feeds 8-10 people for a snack, fewer for a meal)

340g unbleached bread flour
127g cold water
127g beer (I used BrewDog's Punk IPA)
~30g walnuts, very coarsely chopped (could probably up this to ~45g without trouble)
7g salt
4g instant yeast (could probably go down to 3g and give it two nights in the fridge instead of one)
maybe 4oz finely cubed cheese that melts (I used about 2/3 of a 6oz block of sharp cheddar)
The night before baking, in a bowl combine the flour, salt, yeast, and nuts then mix. Add in the water and beer, stirring with a wet wooden spoon for 1-2 minutes, until the bread is an even consistency. It should lightly stick to your finger if you push it with a little pressure, but the finger should pull away mostly clean with little stretching of the dough. Let rest for 5-10 minutes in a covered bowl. Then stretch-and-fold the loaf 4 times, waiting 10 minutes between each iteration. Especially on the first iteration, the dough may rip - be careful to not let this happen. It should be very firm and resist the stretching quite a bit by the final iteration. Put the dough in a covered bowl in the fridge and let sit for at least a night.

The day of baking, about 2 hours before placing the bread in the oven, remove the dough from the fridge. Flour a work surface and your hands. If making a spiral, pat the dough into a rectangle that will roll up into a loaf and spread the cheese over the surface, then roll up the log, smooth the seam closed, and gently roll into the desired shape. If kneading in the cheese, gently work the cheese into the dough mass, then proceed to shape it as you see fit. Let the dough proof on a parchment-lined baking sheet, covered, for at least 1.5 hours.

Preheat your oven to ~500 degrees and place the bread in after waiting for the proofing time. Reduce heat to 450 and cook for 15 minutes before rotating, then cook for another 15-25 minutes. The internal temperature should be in the 185-195 degree range before you call it done. Let the bread cool a bit before slicing. Eat.